royal inspiration


So as you all know, the world is going crazy about the royal wedding.  I thought I would join in on the fun and show you ways to stylishly bring a little British royalty into your own home.

 Crowns...


British inspired pillows...

easter egg wall decor

Ok so it's about time I show y'all an Easter craft!

You guys have seen my Christmas and Halloween burlap signs, which are really cute, but can be pretty time consuming and messy to make.  So when I decided to make a little Easter decor, I knew I wanted to try using a different material....ALUMINUM WIRE SCREEN! It's easy to cut with your regular scissors, you can get a lot for cheap, and it doesn't make a huge mess!


You can find a roll of aluminum wire screen at Home Depot or Lowes in the back by the window stuff.

 Draw out an egg pattern on paper, tape it to the wire, and then cut it out.

 Now for the painting! (I used acrylic paint)
I found that the best way to paint this is by hanging a wire hanger so that it is not touching any surface (on the knob of a drawer that is pulled out) and letting the egg hang from it using a clothes pin to attach it. I hope that makes sense!

Starting with the base color.  Gently hold the screen with one hand while you glob on the paint with a big paint brush. Don't worry it doesn't have to be perfect and not all the tiny holes will be filled in.  That's what helps give it the shabby chic look.  You can add a second coat if you think it needs it, but luckily I didn't have to.

I mixed several colors together until I had a robin's egg blue I was satisfied with.
 Now for the fun part! Speckles!
After you let the screen hang dry completely, lay it on some cardboard or newspaper away from anything that you don't want to get paint on.  Mix a little paint with a little water in a shallow dish or bowl.  I used three different colors for the speckles to make it look more textured and dimensional.  Using a paint brush, have fun splattering the paint all over the egg.  Do this until you like how it looks then let it lay flat to dry.

Once it was dry I made a bow for the top and a little loop to hang it.  I hand tore strips of fabric at different lengths and gathered them together in the middle with another little strip, securing it with hot glue.  Then I attached the bow to the front of the egg, and the loop on the back using hot glue.

It's a very fun, stress relieving project since you don't have to worry about perfection.  The more messy the better! 

And the end result is pretty easy on the eyes!

I hung mine above my faux mantle to replace the hanging pine cones.
Sorry for the bad lighting!

So sorry I didn't share this Easter decor idea sooner! However, I think this would make a fab spring decoration so I'm going to leave it up a few more weeks!

Now what to do with all this left over wire screen...


Y'all know I'll be linking up to THESE parties!

berry collar pin

Collar pins are easy to make and will add a little cheerfulness to your spring wardrobe!
Simple and fun!
What you need:
-Three small covered buttons (I covered mine in a cotton red fabric)
-Stiff green fabric (I used an upholstery sample I had on hand because I liked the texture)
-Embroidery thread in contrasting color
-Sewing needle
-Tie tack pins
-Felt
-Scissors 
-Permanent Fabric Glue (Fabri-Tac)

 What to do:
-After you have covered your buttons, arrange them in a triangle and attach them together with a tiny amount of fabric glue.
-Then cut a couple of leaf shapes out of the green fabric.  One should be a little smaller than the other.
-Now take your embroidery thread and hand stitch a line down the middle of each leaf.
-Once both of the leaves are completed, glue them together.  Smaller leaf on top of larger, angled to the side, like a fan.
-Glue the leaves to the back of the berries. (make sure glue doesn't show through the opening in the middle of the berries)
-Cut a small piece of felt to cover the back.  It needs to be small enough so that it doesn't show from the front.
-Now glue it to the back.
-To finish, all you have to do is glue the tie tack pin to the center of the felt. 


And just like that you have an adorable spring accessory! 


Click HERE to see who I'm linking up to!

inspiration via pinterest

Pinterest is a great source for discovering inspiration, and I am loving it!

Here are some of my most recent bathroom inspirations. Enjoy!
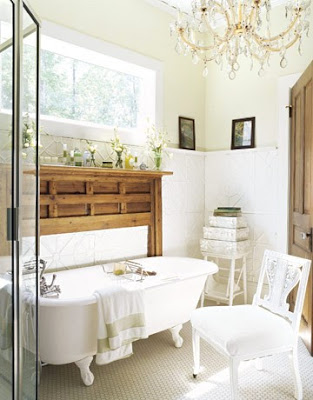
Look how nicely the mantel frames the clawfoot tub.  Genius.
Beadboard in the bathroom...love it!
 This reminds me of my hanging room dividers post
(so want to do this)
I have always been in love with subway tiles!
In my dreams...


(photos via pinterest)

shoe clip tutorial

Shoe clips!

The perfect spring accessory to make your plain flats or pumps more interesting.  

So get to crafting! This won't take long!
These shoe clips were inspired by the button earrings I made.  They are basically made the same way.

What you need:
-cardboard (I used a cereal box)
-batting
-fabric
-needle and thread
-felt
-scissors  
-clip (hair clip or clip on earring)
-hot glue gun

What to do:
-Draw a 2 inch diameter circle on the cardboard and cut it out.
-Then cut out a 3.5 inch diameter circle from the fabric.

-Sew a loose stitch around the edge of the circle.  Then pull to slightly gather.  Don't cut the thread yet.
-Cut a piece of batting the same size as the cardboard circle.

 -Now it's time to assemble the pieces.

-Place the batting circle on top of the sewn fabric circle and the cardboard on top of that.
-Now pull the thread to completely close the fabric around the cardboard and batting. 

-Make sure the fabric is pulled tightly around the edges.  It helps to sew a few quick stitched on the back to ensure that everything is securely in place. Knot and cut the thread.
-Repeat these steps to make a pair.

-Then cut out two felt circles that are slightly smaller and glue on the back. 
-Now glue the clip on earrings to the back of the shoe clips.

-You can use just about any kind of clip to temporarily attach them to your shoes.
(bobby pins or hair clips will work great)
For these, instead of gluing the clips on, I cut two small slits in the felt and slid in one end of the clip.

These were so easy to make that I had to make a few more!


Too cute right?


Enjoy your weekend!